Step-by-Step Guide: How to Properly Use 4-Way Pressure Clamps
Table of Contents
Understanding the 4-Way Pressure Advantage
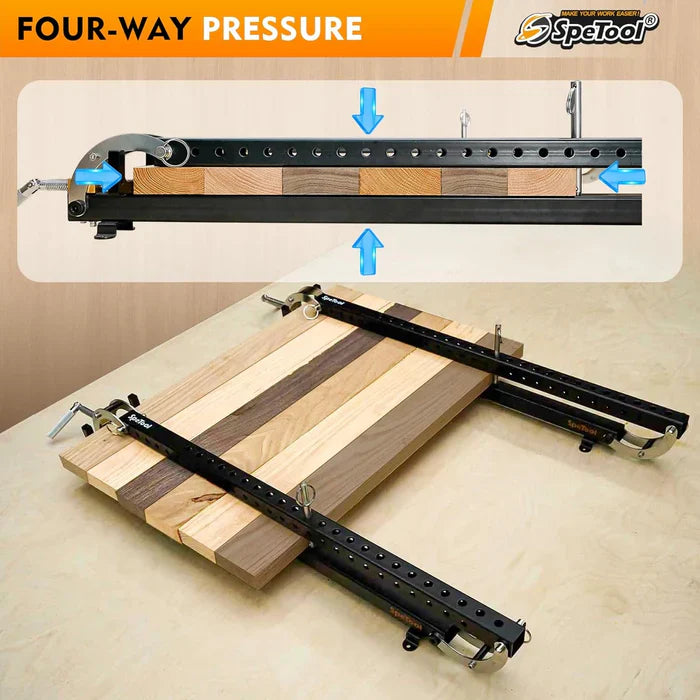
For woodworkers, achieving a perfectly flat tabletop or cutting board is often the most challenging part of a project. Traditional bar clamps apply pressure from the sides, which can cause boards to buckle or 'tent' in the middle. This is where panel clamps become essential. By using a 4-way pressure system, these tools apply force from all four directions simultaneously, ensuring your glue-up stays flat and your joints remain flush.
The spetool panel clamp utilizes a unique parallelogram-action coupler system. This design translates horizontal clamping force into vertical pressure, sandwiching the wood between the clamp bars while pushing the edges together. Whether you are building a wide door panel or a thick bench top, using the right spetool clamp setup can save you hours of sanding and planing.
Key Features of the Spetool Panel Clamp
Before diving into the operation, it is important to understand why the 24-inch 4-way panel clamp 2-pack stands out for both hobbyists and professionals:
- Dual-Direction Clamping: Clamps in two directions at once for flatter panels.
- Versatile Adjustability: Accommodates widths up to 24 inches and thicknesses from 1/4" to 3".
- Durable Construction: Made from high-quality steel pipe with a powder-coat finish and copper thread bushings.
- Easy Glue Removal: The special surface treatment allows dried glue to be popped off easily without damaging the fixture.
Step-by-Step Instruction Guide
1. Prepare Your Material
Ensure your lumber edges are jointed straight and square. Use a jointer or a table saw with a high-quality blade to ensure there are no gaps between the boards.
2. Adjust the Clamp Width
The spetool panel clamp uses fix pins and parallelogram couplers. Place your boards onto the lower bars and adjust the vertical supports to match the total width of your panel. Insert the fix pins into the appropriate holes to lock the width in place.
3. Apply Glue and Align
Apply a consistent bead of wood glue to the edges. Lay the boards flat across the support bars. Because the spetool clamp provides even pressure, you don't need to worry as much about boards shifting upward under tension.
4. Engaging the 4-Way Pressure
Place the top bars over your wood. As you turn the handle, the parallelogram couplers will begin to pull the top and bottom bars together while simultaneously squeezing the sides. Tighten until you see a small, even amount of 'glue squeeze-out' along the entire joint.
Manufacturer Tips for Success
Although the operation process is simple, follow these expert tips from the manufacturer for the best experience:
- Check Your Square: While the clamps prevent buckling, always use a precision square to verify the first board is positioned correctly.
- Board Thickness: For very thin panels (near 1/4"), ensure the parallelogram couplers are seated fully to prevent the bars from skipping.
- Spacing: For a 24-inch panel, we recommend using at least two clamps spaced about 8-12 inches apart for even distribution.
Maintenance and Glue Cleanup
One of the best features of the spetool clamp is its durable powder-coat finish. If glue spills onto the steel pipes, wait for it to partially dry. It can then be easily removed by hand or with a plastic putty knife. This prevents the build-up of residue that could mar your next project. Periodically lubricate the copper thread bushings with a dry lubricant to keep the screw action smooth.