Struggling to drill a straight hole through a round tool handle? This step-by-step guide shows you how to get perfect, centered holes without a drill press. Learn why a self-centering vise and a portable drill guide are the secret to keeping your bit straight—whether you’re working with wood, metal, or irregular surfaces. No more crooked holes or ruined handles.
Table of Contents
-
Why Is Drilling Through a Round Handle So Tricky?
-
What You’ll Need (The Tools That Actually Work)
-
Step 1: Secure the Handle So It Doesn’t Roll
-
Step 2: Mark Your Hole – and Make Sure It’s Actually in the Center
-
Step 3: Keep the Drill Bit Straight (This Is the Hard Part)
-
Step 4: Drill Slow, Let the Tool Do the Work
-
What If I’m Drilling Metal? (Like a Hammer or Axe Handle)
-
Why a Portable Drill Guide Is the Secret Weapon
1. Why Is Drilling Through a Round Handle So Tricky?
You’ve got a hammer handle that needs a new hole. Or maybe you’re making a custom tool handle from scratch. You clamp it down, line up your drill, and… the bit skates across the rounded surface. When it finally bites, the hole comes out crooked—not even close to straight.
Sound familiar?
Here’s the problem: round surfaces don’t have a flat reference point. Your drill bit wants to slip sideways, and your hand drill wants to tilt. Without the right setup, you’re fighting physics the whole time.
The good news? You don’t need a drill press to get it right. With a few simple tools, you can drill a perfectly straight hole through any round handle—wood or metal.
2. What You’ll Need (The Tools That Actually Work)
You don’t need a shop full of expensive equipment. Here’s what actually helps:
| Tool | Why You Need It |
|---|---|
| Self-Centering Vise | This clamps round handles without crushing them and automatically centers the workpiece |
| Portable Drill Guide | The #1 tool for keeping your drill bit perfectly vertical |
| Sharp Drill Bit | A dull bit wanders and overheats—get a new one for clean holes |
| Center Punch | Creates a tiny dimple so your drill bit doesn’t skid |
| Clamps (if no vise) | If you’re working on a bench, clamp the handle securely |
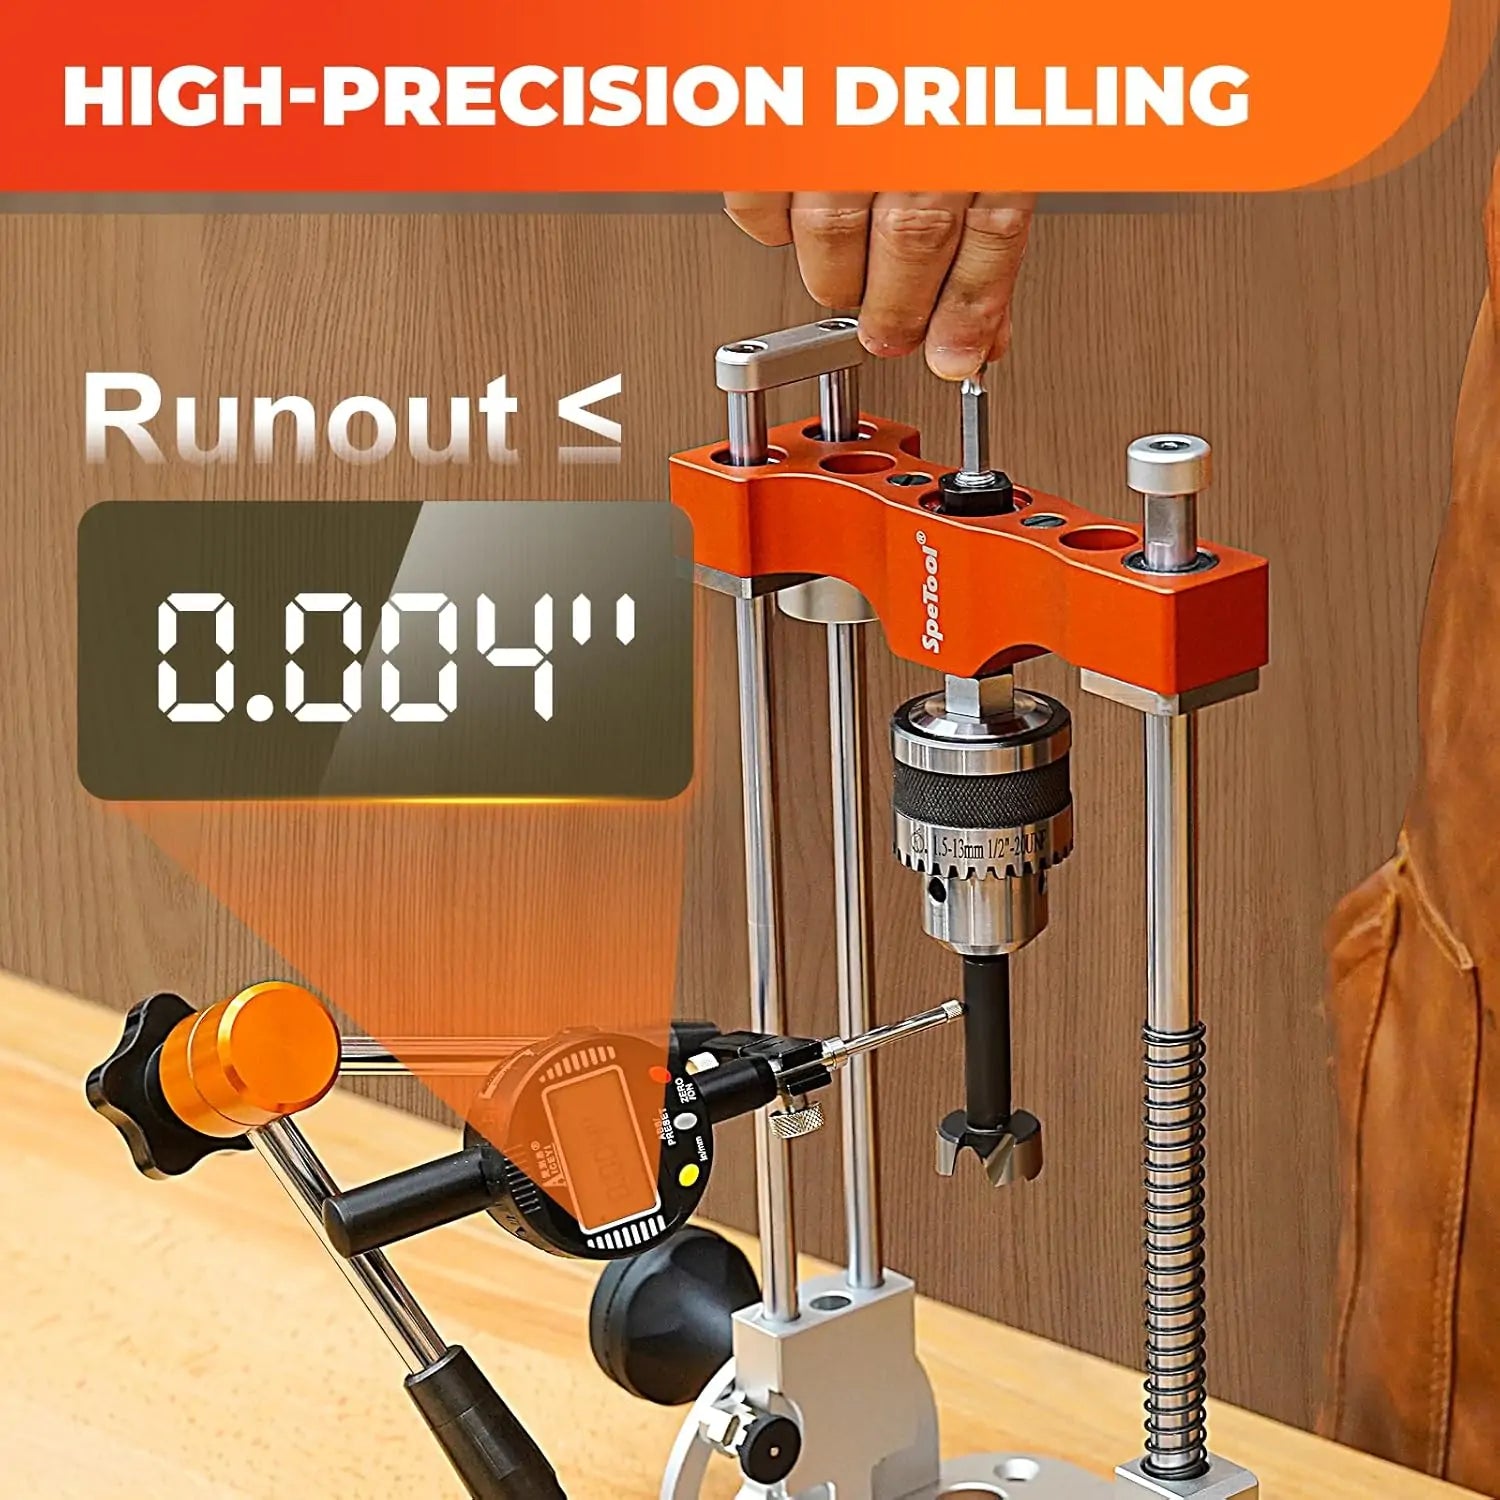
If you’ve never used a portable drill guide before, think of it as a “stabilizer” for your hand drill. It slides over the bit and forces it to stay 90 degrees to the surface. Game changer.
3. Step 1: Secure the Handle So It Doesn’t Roll
This is where most people mess up. You can’t hold a round handle with one hand and drill with the other—it will spin, and you’ll end up with a crooked hole or a scraped knuckle.
Best option: Use a self‑centering vise. It’s designed to grip round or oddly shaped objects. You place the handle in the center, tighten the jaws, and the workpiece stays locked in place.
No vise? Use a bench clamp and a V‑block (or even a couple of wood scraps with a groove cut out). The goal is to stop the handle from rotating when the drill touches it.
4. Step 2: Mark Your Hole – and Make Sure It’s Actually in the Center
If your hole isn’t centered, it doesn’t matter how straight it is—it’s still wrong.
For round handles:
-
Use a center finder or a combination square to draw a line across the end of the handle, then another line perpendicular. Where they cross is your center.
-
Or just use a center punch and tap it right where you want the hole.
Why the punch matters: Even if you have everything clamped perfectly, a drill bit will wander on a round surface. A small dimple gives the bit a place to bite.
5. Step 3: Keep the Drill Bit Straight (This Is the Hard Part)
This is where a hand drill usually fails. Even if you start straight, your wrist can tilt slightly as you push, and suddenly the hole exits at an angle.
The fix: A portable drill guide.
You slide your drill bit into the guide, set the depth, and place the guide’s base flat against the handle. When you drill, the bit is locked in a vertical track—it can’t tilt. No matter how hard you push, the hole stays straight.
Pro tip: Use a stop collar on your drill bit to control depth. Set it so the hole goes exactly as deep as you need—no deeper, no shallower.
6. Step 4: Drill Slow, Let the Tool Do the Work
Once everything is set up:
-
Start the drill at a slow speed until the bit bites into the wood.
-
Keep steady, even pressure—don’t force it.
-
Let the bit pull itself through. If you hear squeaking or see smoke, pull back and clear the chips.
For wood handles, you can usually drill in one go. For metal (like a hammer or axe head), go slow, use cutting oil, and clear chips often.
7. What If I’m Drilling Metal? (Like a Hammer or Axe Handle)
Drilling through metal is a different story. It’s slower, hotter, and requires more patience.
| Material | Tips |
|---|---|
| Soft metal (brass, aluminum) | Use a sharp bit, slow speed, steady pressure |
| Hard metal (steel, hardened tools) | Use a cobalt or carbide bit. Start with a small pilot hole, then step up to your final size. Use cutting oil. |
The drill guide helps here too—especially with metal, where any wobble can snap a small bit. Keeping the bit perfectly straight prevents breakage.

8. Why a Portable Drill Guide Is the Secret Weapon
If you’ve been struggling with crooked holes for a while, you’ve probably tried everything: marking carefully, clamping tighter, drilling slower. But without something that physically prevents the bit from tilting, you’re always fighting your own hand.
A portable drill guide does one thing, and it does it perfectly: it keeps the drill bit straight.
The SpeTool guide, for example, uses a three‑rod linear bearing design. That’s just a fancy way of saying it’s incredibly rigid—no wobble, no play, even when you’re drilling at an angle or through tough material.
If you’re doing any kind of woodworking or tool repair, this is one of those tools you buy once and wonder why you didn’t get it years ago.